Website powered by

3D Prop Creation Making Process

Work In Progress / 12 January 2022

3D Character Creation Series:

Part 1
Part 2
Part 3
Part 4
3D Prop Creation Making
Final Product

The whole stage of making this prop took me an entire day (1 Day).

The process roughly the same as I did with what I've done with my Character Creation. Instead of repeating everything all over again, I only going to mention different twist that I've done in this project as well as the progress screenshots.

Prop Concept:

The prop and the character are 2 different assignments, yet, in my head, I was thinking of something that are different yet its under the same theme so that when its being combined together, the viewer might thought that these models are made for each other.

My character model has a slightly Alice in Wonderland theme into it. So I was searching for props that has a same theme.

I came across this picture:

its a concept artist from the game Alice: Madness Return.
The prop that I will be using is the Red Hobby Horse. 

The idea behind it is that this is the wand in which Princess Breakfast will use to cast her magic spells and to transport herself from home to home in order to wake the children up in the morning.

With the character design as an original design and the prop design as the one I copy from another artist, I want to demonstrate to the viewer that I have the capability of doing both when it comes to my 3D artistry.

Prop Sculpting

Instead of entirely using Maya for my hard-surface modeling, I'll use Zbrush as the center of it all because I am more skilled on Zbrush compared to maya in terms of initial modeling.
As per usual, I start my sculpting by using series of primitive shapes in which fitting with the prop's silhouette.

From here I make my way to details


Retopology

And then, retopo them in Maya

This is basically hard surface model, so the flow of the polygons are not as much scrutinized compared to the one in the character modeling. However, I was thinking of the possibilities that maybe that this wand has an ability to talk and interacting with living being so I deliberately made the face topology as that of the one that could facilitate of the possible rigging on the face for that to happen.  

UV Mapping + Substance Painter + Rendering

This time around, the making went smoothly compared to the on Princess Breakfast. There is a slight defect here and there but its not that visible.


Rendering result:

Overall, I think I've learned from my mistakes after doing at least 3 times the process of the same thing, however, I still feel like there is a need of improvement in the realm of UV and baking. There is still slight defect on some parts of the model after baking. need more investigation into it. This work definately show a sign of major improvement in my skill.  
3D Character Creation Series: Part 4, Character UV-Mapping, Substance Painter and Rendering.

Work In Progress / 12 January 2022

3D Character Creation Series:

Part 1
Part 2
Part 3
Part 4

3D Prop Creation Making
Final Product

For timing, UV-Mapping took a day while Rendering and Texturing happens the following day (2 Days in total)

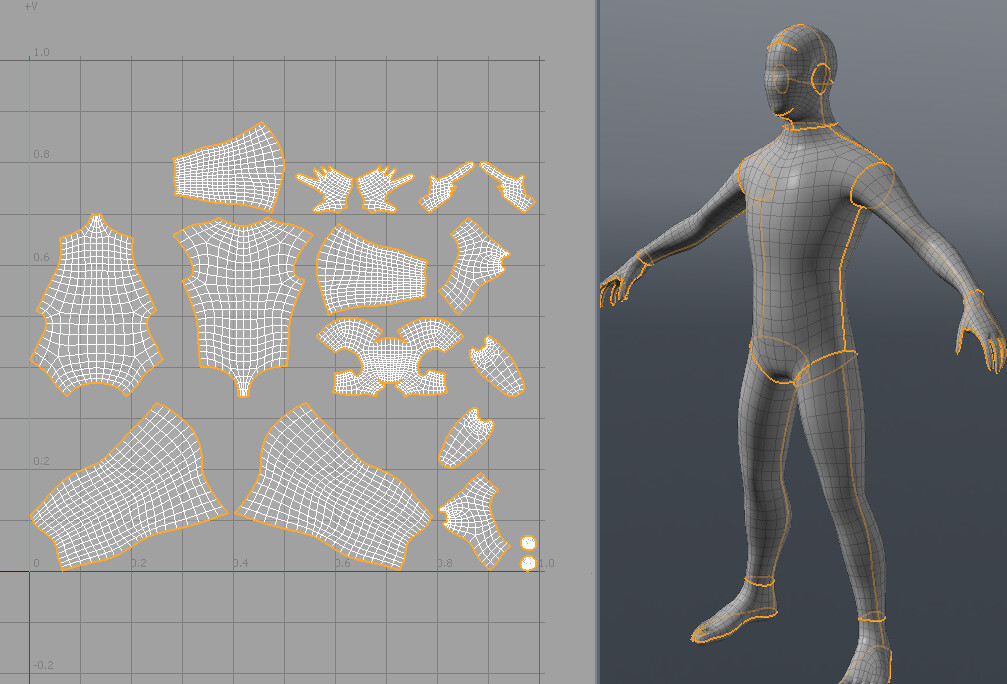
UV Mapping

After the retopo process is done, we moved on into UV-Mapping.
First of all, what is UV-Mapping:

"UV mapping is the 3D modeling process of projecting a 2D image onto a 3D model’s surface. The term “UV” refers to the bidimensional (2D) nature of the process

The 3D model is unfolded at the seams and laid out flat on a 2D plan, not unlike the process used for pattern-making in sewing. Once the mapping is complete, the artist can produce a custom image based on the “pattern” and apply it to the 3D model. This process makes it possible to produce models rich in color and detail. Other processes exist to color models, but they have much narrower limitations."

-Bruno Deschatelets

Basically disable the 3D models and flatten it into 2D so that its easier to paint eventually.

For this process, similar to retopology process, I try to look out for references which are relevant to my project.

Henning Sanden

As for the other article of clothing, look at the items I had on the wardrobe and see how they're being cut and sewn together and use it as a refrence.

For example, for her hat I am looking online on how one sewing a top hat and apply that on how I cut my UV parts for my model:

Steampunk Top Hat

After references gathered, head on into Maya and have 2 panels of the window for both perspective view and UV editor view.

Select the whole retopologized mesh> Create> Camera-based, to project the mesh onto the UV panel.

like retopology section, select a mesh that you want to start working on and hide the rest.

Go to UV> 3D Cut and Sew UV.
Using the refrence gathered, select the lines to cut the 3D mesh accordingly. 

When satisfied with all of the cuts, select the whole mesh > Right Click + Shift> Unfolded> Unfolded.

Now that everything is flatten into 2D, I want to make sure everything is in uniformed size minimized so that everything will fit into a box. The tool that might be useful for this is that go to UV Toolkit> Tools> Set up the desired number on the box depending how complicated and how much space you need for the whole mesh (preferably below 10)> Select the whole 2D faces> Set.
Now everything  is minimized, I just need to place them on one box like a puzzle, making sure I use the space efficiently.

After everything is done, Import the High Poly FBX.

Make sure the retopo mesh and the high mesh are in the exact position.

Rename the low and high poly meshes the same same but put _low on the tail of the lower poly mesh and _high on the tail of the high poly mesh.

Export the low and the high meshes separately in FBX format.

Substance Painter

Go to Substance Painter, File> New> Select> Low Poly Mesh FBX file. 

And then,

For baking high poly mesh into low poly mesh, go to Texture Set Setting> Baking.
These are my default setting for my baking. I occasionally tinkering with Max Frontal Distance and Max Rear Distance slider to make sure the baking process as nice as possible. If there is less detail on the model, 0.1 on both would suffice. If there are bunch of details, 0.025 would be alright.

Select materials that are relevant, select the brush tool. Do not forget to change the brush alignment into UV so that when I paint on top of the UV, it wont leak to the neighboring UV. I'll adjust the opacity of the Stroke opacity so that its easier to bend 2 colors together in a UV.

When everything is done, export the texture into a folder that I want these texture would be in.

Rendering

Going back to Maya, now I can put in texture on top of the low mesh that I messed around with earlier.
Select all low poly mesh > RIght Click + Assign New Material> Shader> aiStandardSurface.

Insert:
Base color: Base> Color> Insert _Base_color file> sRGB> Alpha is Luminance.
Metallic: Base> Metalness> Insert _Metallic file> Raw> Alpha is Luminance.
Roughness: Specular> Insert _Roughness file> Raw>Alpha is Luminance.
Nomals: Geometry> Bump Mapping> Tangent Normal> Insert _OpenGL file> Raw> Alpha is Luminance.

I use HDRI for the lighting. I use the exposure slider to adjust the light intensity. Visibility f the camera should be 0 so that the HDRI pictures wont appear on the rendering window.

Overall, most of my Issue is on baking. There is a research needed for me to perfecting it. some part of the body has this weird "stains" for some reason:

I do not know if its because the placement of the high mesh and the low mesh are not too align or is it in the fault of me for not cutting the UV properly.

I've also noticed that one of the nail is missing. perhaps thats the fault of the high poly is not being checked properly if the nail is visible enough when being sculpted or not or is it because of the retopo + UV are not properly executed so that the nail is not visible.
These are the things that should be researched in the future for a better quality of 3D Character modeling.


3D Character Creation Series: Part 3, Character Retopology.

Work In Progress / 12 January 2022

3D Character Creation Series:

Part1
Part2
Part 3
Part 4

3D Prop Creation Making

Final Product
 

Timing wise, Retopo took me 2 days at tops, a day for body and another day for the props and details.

Retopology is a stage of where one reducing the amount of polygons which ones create after sculpting a mesh that contains a lot of polygons. It this process, instead of literally reducing the polygon straight in the high polygon mesh, we create them on top of the high polygon mesh to create roughly a roughly similar shape with the high poly mesh.

^Comparison between high poly mesh (left) and retopologized  low poly mesh (right).

To start, I researched relevant references which could contribute of me having a functional retopologized character for animation. Not only that I have to think about reducing the polygons, I also have to pay attention to the flow of the polygon lines so that when being animated, it wont create weird body morph or horrible physical movements.

These are my references:

Face:

Problem Faced when doing re-topology

Nazar Noschenko

Body:

T-Machine

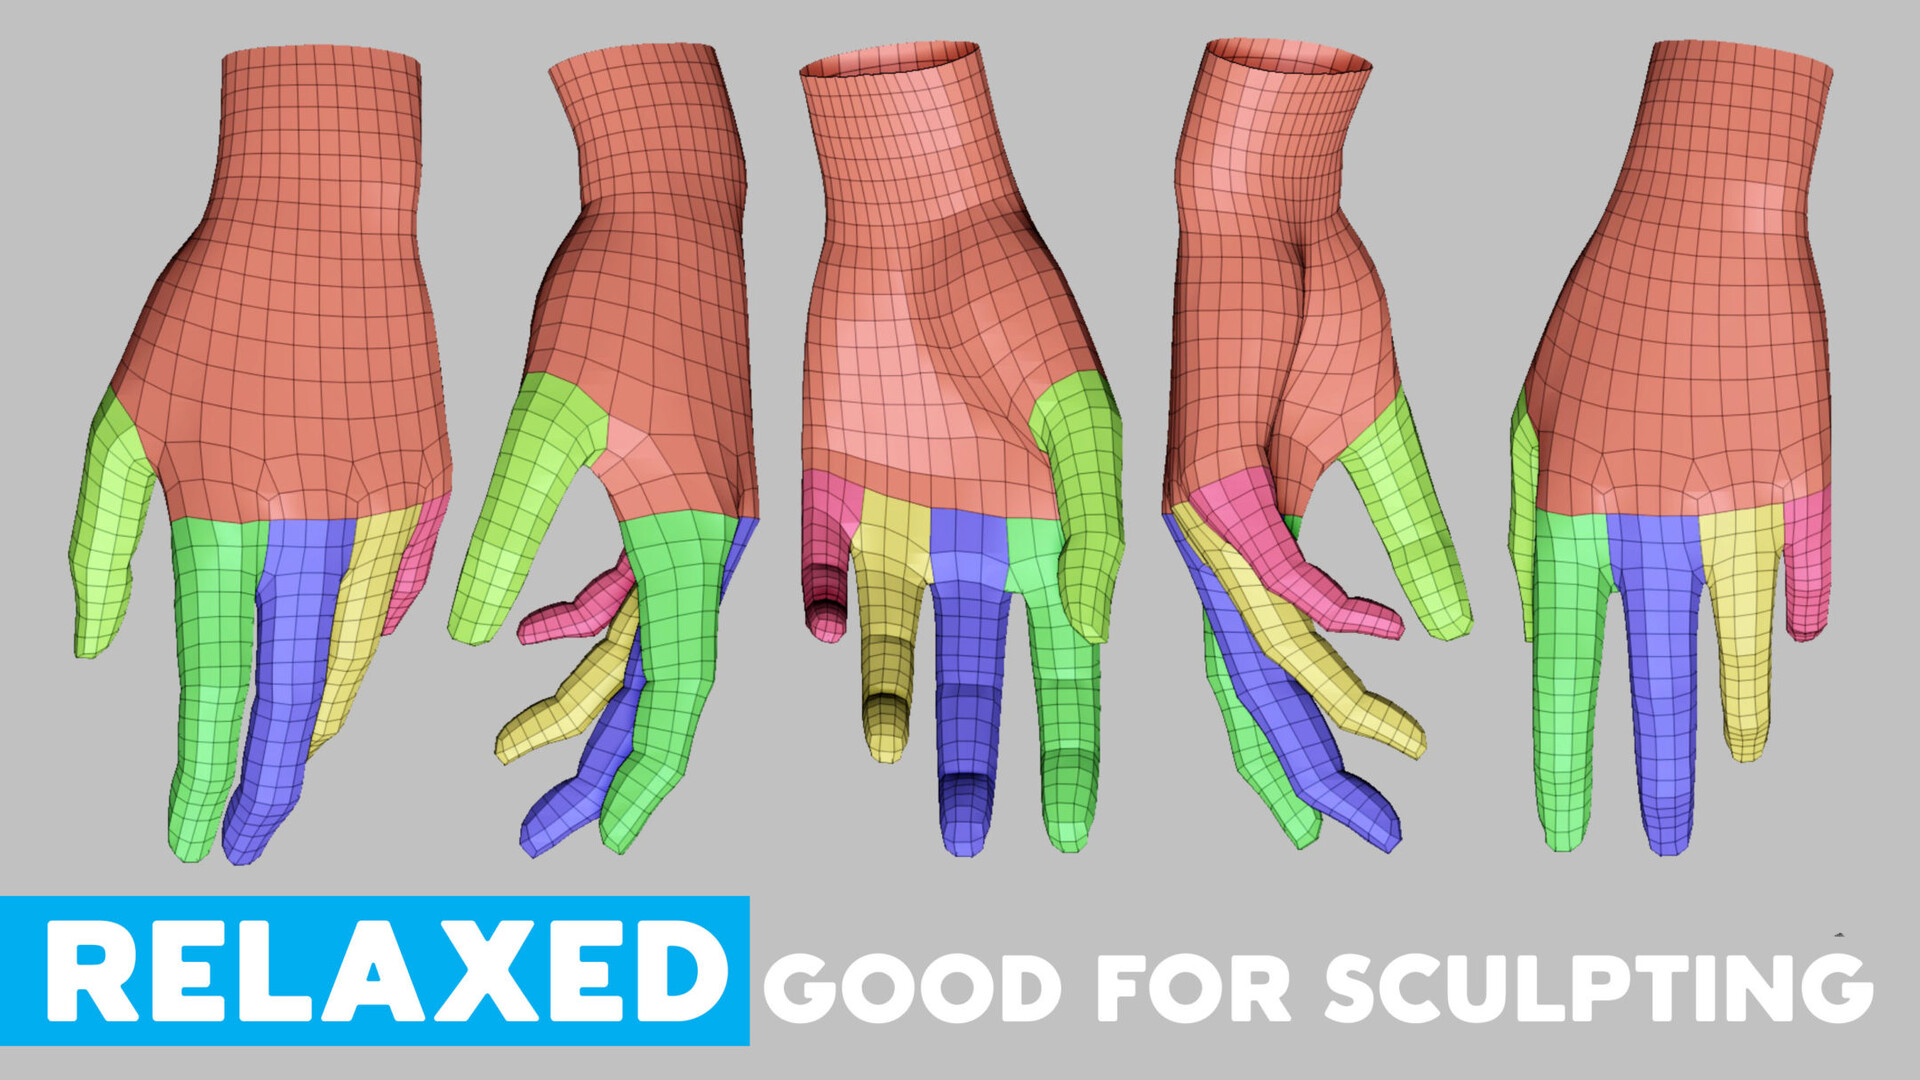
Hand:

Hand Basemesh by Aladosha

To start the retopo process, I need to merged relevant parts of the body together. What I mean by relevant is that, when being animated, these body parts will flow together. Different parts of the body that would not flow together would be retopo-ed in different layer:

After that, save the highest poly mesh in form of FBX and then, ZRemeshed everything to the lowest poly avilable yet retained its primary shape and save that into another FBX file.

Move the lower mesh into Maya. Select one of the part of the mesh that I wish to retopologized first and hide the rest.
Select the visible mesh> "Live" Magnet> Modeling Toolkit> Multi-component> Quad Draw.

These are the fundamental Hotkeys that should be remembered:
1. Select Loop: Tab + Middle Mouse Button.
2. Extrude: Tab + Left Click Drag.
3. Delete: Control + Shift.
4. Add Loop: Control + Hover.
5/ Relax/Smooth: Shift + Left Click.

First thing first, I create polygon around the joints and the flow foundation of the polygon flows (look at the refrence), 8 faces each. It is to create a goal post to make sure that everything will connect nicely and keep the polygon as low.
(More tutorial about this) 

After the base faces are created, connect them all together to create a new mesh.

Be mindful of the thickness of each of the different article. some article of clothing such as skirt, scarfs, straps, ect. will have very thin volume. Instead of creating double face, make them one faced instead.

After everything topologized, Identified the one faced sections, select them one by one and extrude them to cover up the back face with controllable thin thickness.

 Also, test out on how it would look like when its smoothen (press 2).

When being smoothen out, some part that should've been sharp looking is not as sharp, add in loop nearby the loop that you want to sharpen to achieve the result.

Create a mouth bag inside the head to cover up the hole of the mouth.

Identify the part of the mesh that would be covered by another mesh (ex. on top of the head)  or wont be distorted (ex. hard surface), create triangles to reduce the number of polies.

Overall, it takes me months to get this process right, struggling along the way especially when it comes to hands. I have to browse around for better references for it. there are lots of joints on hand that is hard to connect properly without adding more loops and every time I add in more loops the whole mesh is effected. I usually create triangle on obscure places (like the hand cuff in on the wrist in this case) to transition polygons on hand into arm properly and keep the polygons low and ini the flow. 


3D Character Creation Series: Part 2, Character Sculpting.

Work In Progress / 06 December 2021

3D Character Creation Series:

Part 1
Part 2
Part 3
Part 4

3D Prop Creation Making
Final Product

Sculpting Process took me 1 weeks in making because I want to perfecting the details of the character and receiving a lots of feed back with my sculpting technique. 

what I like to do when I begin my character sculpting is that thinking in terms of silhouette, same as when I think of character concept.
I like to think in terms of "primitive shapes" when it comes to sculpting my character.
The reason behind it is to ease me to shape the character in larger scale. and also make it easier to do some modification when I am not satisfied with certain parts of the body without have to worry that I'll alter the other parts of the body.
First thing first, I focused on creating her body

placing these primitive shapes together to create the body without merging them together. each primitive shapes would be ZRemashed to lower its polygon so that shaping process would be much faster, smoother and easier.
After I am satisfied with the shape, I merged them together and DynaMesh them to fill out the gaps between each of the primitive shapes. I make sure to black them out so that the silhouette that I want is translated perfectly. Use Divide to solidify and smoothen the character even more.

The second thing I focused on is her face.

I created a couple of sphere (eyeballs) and place it on top of the face mesh to ease out creating of eyelids and sockets on the face and then use ZRemasher again on the face to ease shaping the general form of the face. I generally use ClayBuildUp brush to sculp the face in the beginning, after I got the shape that I desired, I smooth them out and use SnakeHook brush to clean up the shape and to make sure the size of the face is proportional. After that, I use DamStandard Brush to emphasize the lines and create details on the face and then use Divide to solidify and smoothen the whole face.
For the lashes and the eyebrows, I've created them in different sub tools apart from the overall face. As usual I used ZRemasher again to shape them. This time I only use SnakeHook brush to shape everything and use DamStandard brush to create details. Use Divide for finishing touches.


I focused on the hair and hat creation for my 3rd step. I used the same process of what I did on the face and the body.

4th, her hair:

This time I use slightly different technique when it comes to her hair-roots. I masked on top of her head in which the roots of the hair will cover and use Extract with ~0.005 thickness. As with any other parts of the body, I've used the same process (ZRemesh> SnakeHook> DamStandard>Divide). 

5th, extra Acsessory of her hat:

6th, Upper Clothing:

7th, Socks:

8th, Ruffles and Skirts:

The 0 thickness is important so that the fabrics on the ruffle and skirt is on 1 face mesh to reduce the unnecessary polygons. It is also made it easier to create a mesh in which it is thin and light.


360 sculpture viewing:

Front
 

Side 1,

Side 2,

Back,

For body blocking, I'm using a refrence from Turbo Squid

My struggle on this sculpting is to get my folding of the clothes right.
At first, the "bulging" from the folds were too big because I've used big DamStandard brush and intensity. I ended up have to smooth it out and using smaller DamStandard brush.
In order to create more realistic folds, I used references from the other existing 3D Models or in real life example:

The sculpting still need a bit of refine especially on the folds and the broderies. After this, Retopology is in order.


3D Character Creation Series: Part 1, Character Concept.

Work In Progress / 13 November 2021

3D Character Creation Series:

Part 1
Part 2 
Part 3
Part 4

3D Prop Creation Making
Final Product 
 

For my journey to understanding character sculpting, I'll be using my "Final Project" as a canvas of my accumulated knowledge that I've undergo in my modeling course.

For starter, I should determine of what kind of characteristic and story in which the character that I will make would be. This process taken me 1 week in making.
 
My starting point is to think in terms of the target audience of the said character would be catered for, this could change the way you want to build your character drastically. If its for children movies/games, I should put myself through the lenses of the children on what kind of character that they would be attached with, same goes if I want to build an adult themed character.
For my project I decided to take the route of producing a character that carters for children (5-12 years old). This means that my character should be something that perceived as non-threatening, friendly and approachable. something that is more ethereal opposed by realistic.

The setting of where the character would be in is in  bed-time story fairy-tale.
The character is a fairy in which her job is to wake the children up in the morning so that they wont be late on their morning schedule. She will go door to door, spreading the feeling of serenity to the kids she visits so that they would have a good mood after they've being woken up from their dreams. Instead of having a bubbly character in which forces the children to woke up abruptly, the character would be pretty soft and soothing. She will also represent good things about morning itself by her attrite. She should look relatable to the children, thus, having her looking like a child would be viable option.

I've collected a mini mood-board in which represents the theme that I've determined.

From this mood-board amalgamation, I've created a character:

Her name is Princess Breakfast.
I'm using the color palate that associates with the morning sky.
Her hat represents "Breakfast", an enjoyable morning activity which one would have few minutes after waking up.
Princess Nightgown and soft comfortable socks, the attrite that ones would have when waking up.
Steam hair, associated with the steam that raises up from the hot coffee/tea from the breakfast. 

Now, we blacken out the character to get the sense of the character first impression.
From the silhouette, we could see the lack of harsh edges in the character and overall emphasis of roundness and cutesiness. Instead of using wings to fly like a normal fairy would, breakfast used her cloud-like hair to float. Thus, her hair replace on the significance of wing in the silhouette. The cup hat and the cloud shapes could bring the looker the sense of relief because both of the objects are associated with it.

Textures:

I then proceed to draw 360 version of the character to ease my character sculpting later on ZBrush.

Rough Sketch, on body blocking of the character

Lastly, I've created details of the face. Upon consultation with one of my mentor, it is advisable for me to change the hair for sculpting purpose, so that it would be easier to make and retopo later:

The changes do not take away from the main concept, it is still look like a fluffy clouds but different approach.